
Music Theory Fundementals: The Musical Note [MT-3]

The Musical Note


Notes  on the staff tell us which note  to play on our instrument and how long to play it. There are three parts of each note; is the note Head, the Stem, and the Flag.
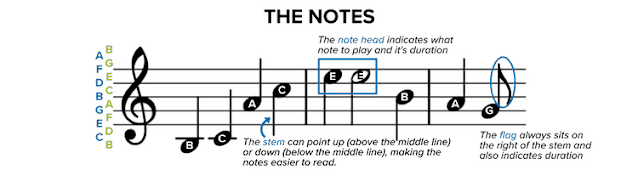
Every note has a note head, either filled (black) or open (white). Where the note head sits on the staff (either on a line or space) determines which note you will play. Sometimes, note heads will sit above or below the five lines and four spaces of a staff. In that case, a line (known as a ledger line) is drawn through the note, above the note or below the note head, to indicate the note letter to play, as in the B and C notes above.

The note stem is a thin line that extends either up or down from the note head. The line extends from the right if pointing upward or from the left if pointing downward. The direction of the line doesn’t affect how you play the note but serves as a way to make the notes easier to read while allowing them to fit neatly on the staff. As a rule, any notes at or above the B line on the staff have downward pointing stems, those notes below the B line have upward pointing stems.

The note flag is a curvy mark to the right of the note stem. Its purpose is to tell you how long to hold a note. We’ll see below how a single flag shortens the note’s duration, while multiple flags can make it shorter still.


For more info: Referenced

Comments

Popular posts from this blog

Welcome to Guitar Therapy - One to one Tutorship

Greetings all string-pulling, jumping, slamming, ass-kicking, ax-wielding musicians. This is for all of you guitar freaks out there! Don't be fooled so easily though, my private coaching sessions do not only cover guitar, but also music theory, learning pathways to advancing your music skills, composition, and basics of arrangements as well. So whether you want to shred out, or learn to write your own songs on your guitar, you are at the right place. It's in a long time we are making, and I think it's finally time to give it away for the new generation. First, before I go any further, I want to say that I'm not a guitar guru, nor a music maestro, I consider myself always as a student of music. Yes, my primary instrument is music, and I also play piano, drums a little bit, and the bass as every guitarist would or should. I've been playing for 29 years and have enough experience teaching not only guitar but music production as well. I have formal education in mus...

Barre Chords [MT-6]

According to the Wikipedia definition it states; "In music, a  barre chord   is a type of  chord  on a  guitar  or other stringed instrument, that the musician plays by using one or more fingers to press down multiple strings across a single fret of the fingerboard (like a  bar  pressing down the strings). In guitar chord diagrams we seen how they are demonstrated in our previous sessions. A bar chord is demonstrated in similarly diagram as shown above. The diagram is interpreted in the guitar tablature manner, where the chord diagram is flipped 90 degrees. If you keep your guitar flat on your lap, that's the view of the diagram in tablature. [A topic which will be covered more extensively in GT sessions later]. The most important factor is knowing what the root note of that barre chords is. Root notes, octaves and more of these will also be covered at GT when I go in-depth with music scales and its applications. The root note on first diagra...

An In-depth look at Guitar Tabs

As we have seen in our previous session, which focused on the introduction of tablature, the diagrams differ from those of chord diagram illustrations. The numbers on the horizontal lines indicate the fret number rather than the finger number. You can see this when you keep going above the 5th or 6th fret on the guitar diagrams. To learn something, I believe the best teacher is a practical application itself. Therefore I have devised a fretting exercise, an improvisation from a Steve Vai exercise I came across a long time ago. It is advisable to use a metronome or if you can, maintain a count yourself while doing the exercise. First, we do it in a simple chromatic run starting from 1st fret on the 6th string. Examine the diagram below. It’s a simple chromatic exercise you start with lowest string and chromatically decend. Once you do then you ascend in the oppsite starting with your pink from the highest string. It’s important to have a metronome on or try and count yourself as you do ...